In situations where the result is based on criteria, you can use the IF statement to return one result if the condition is TRUE and a different one if the condition is FALSE.
Syntax
This is the syntax of the IF function.
=IF(logical_test, [value_if_true], [value_if_false] )
logical_test – A logical expression that returns TRUE or FALSE.
value_if_true – The value the function returns if the condition is met (TRUE).
value_if_false – The value the function returns if the condition is not met (FALSE).
Comparison operators
| Operator | Definition | Example |
|---|---|---|
| = | Equal to | A1=B1 |
| > | Greater than | C1>D1 |
| < | Lower than | C1<D1 |
| >= | Greater than or equal to | D1>=0 |
| <= | Lower than or equal to | C1 <=10 |
| <> | Not equal to | A1<>B1 |
Entering the statement
In order to insert the IF function, enter the following text: =IF(
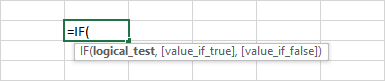
Excel will display the arguments of the function. The first value is required, and the other two are optional. Below you will find three examples that will illustrate how to use this function with a different number of arguments.
Arguments
Cells A1 and A2 contain the following data:
|
1 |
A1: 4 |
|
1 |
A2: text |
We will use this data in the following examples.
One argument
The function syntax may suggest that you can use only one argument (e.g. =IF(A1=1)), but this will return an error. You can use =IF(A1=1,,), which won’t return an error, but it will always return 0, so using this formula is pointless.
Two arguments
If you want to check if the cell value is a number, you can use the following notation:
|
1 |
=IF(ISNUMBER(A1),"Number") // returns “Number”. |
|
1 |
=IF(ISNUMBER(A2),"Number") // returns FALSE since there is no third argument. |
You don’t have to use the second argument.
|
1 |
=IF(ISNUMBER(A1),,"Not Number") // returns 0 since there is no second argument. |
|
1 |
=IF(ISNUMBER(A2),,"Not Number") // returns “Not number” because cell A2 is not a number. |
Three arguments
|
1 |
=IF(ISNUMBER(A1),"Number","Text") // returns “Number” |
|
1 |
=IF(ISNUMBER(A2),"Number","Text") // returns “Text” |
Inserting the IF statement from the ribbon
Instead of entering the statement directly from a cell, you can insert it from the ribbon. In order to do so, go to FORMULAS >> Function Library >> Logical >> IF.
Once you click the formula, a new window will appear.
After you fill in textboxes, Excel will automatically give you the result.

IF function with logical operators
To create more sophisticated formulas, you can use the IF statement along with other logical functions. In this example, we will use AND and OR.
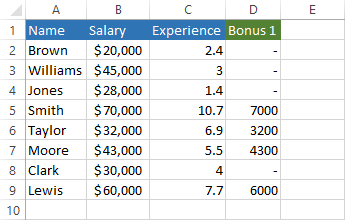
Look at the following example. Here, we used the following formula:
|
1 |
D2: =IF(C2>4, B2*0.1, "-") |
For each row, the formula checks whether a person has more than 4 years of experience. If the condition is met, then a person gets a 10% bonus. Autofill for the rest of the cells to get the following results.
IF and AND
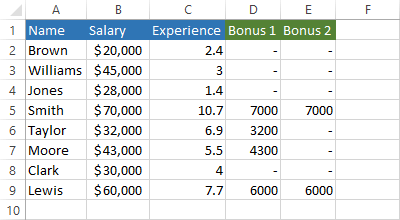
Let’s use the above example again, but this time, we will give bonuses only to people who have more than 4 years of experience and earn at least $50,000. For this example we will use the following formula:
|
1 |
E2: =IF(AND(B2>50000,C2>4),B2*0.1,"-") |
It will give us the following result.
IF and OR
In the last example, we will give bonuses only to people who earn less than $30.000 or have at least 4 years of experience. This time, let’s use the following formula.
|
1 |
F2: =IF(OR(B2<30000,C2>4),B2*0.1,"-") |
And the result is as follows.

Nested IF statements
You can create nested IF statements by using more than one IF in a formula.
But first, let’s create an example with a single IF.
|
1 |
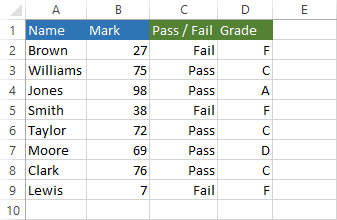
C2: =IF(B2>=60,"Pass","Fail") |
It will check whether a student got at least 60 points. If the condition is met then the “Pass” value is displayed, otherwise “Fail” is displayed. Look at the following example:
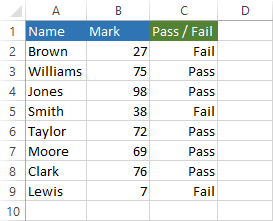
With only one IF we can tell whether a student passed the test or not, but we can’t tell what is his/her grade. Let’s use nested IF statements to deal with this problem.
|
1 |
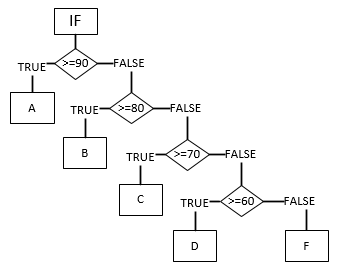
D2: =IF(B2>=90, "A", IF(B2>=80, "B", IF(B2>=70, "C", IF(B2>=60, "D", "F")))) |
As you can see this formula may seem a bit complicated, so let’s use a flowchart to visualize it.
And this is the final result.