We insert pictures in Excel to associate them with certain pieces of information or simply to make our worksheets more visually appealing. We can insert images from the local drive or an external source such as the Internet or directly from a scanner or camera.
Picture resolution
Picture or image resolution refers to the number of pixels that occupy an inch of the picture or image. It is mostly described in Pixels Per Inch (PPI).
Higher resolution means that there are more pixels per inch resulting in a sharp high-quality image. This however increases the file size.
Lower resolution means that there are fewer pixels per inch resulting in a low-quality image and if the image is stretched it can become pixelated meaning the pixels become visible to the naked eye. The file size of such an image is relatively small.
Why change Excel’s resolution?
When we change the resolution of an image it means we are determining how many pixels of the picture we want to occupy an inch of the image. For instance, an image that has a resolution of 150 ppi contains 150 pixels within each inch of the image. This image is sharper than the one that has, for example, 96 ppi.
High resolution in Excel increases the file size significantly. Excel gives us an option to control the file size by selecting the appropriate default resolution for images we insert.
If our Excel file will be used in an environment of high-resolution displays, we can select a high-resolution option that allows us to insert pictures into Excel with minimal compression for optimal display on high-resolution monitors.
If we want to free up space on our hard drive, send the Excel file via email, or reduce the Excel file’s upload/download time on the Internet, we can choose a lower resolution option to reduce the file size.
How to change Excel’s default resolution
To change the Excel file’s default resolution, we use the following steps:
- In the Excel file, click File.
- Click Options in the left sidebar.
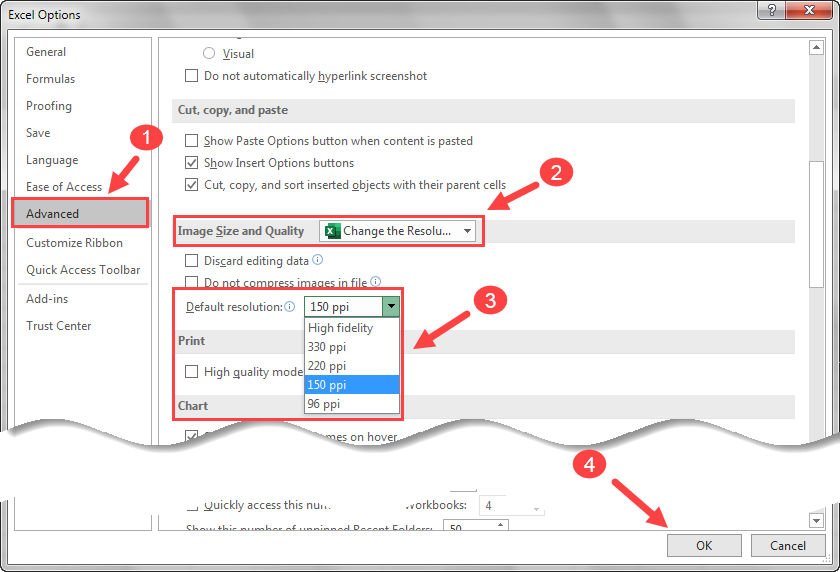
- In the Excel Options dialog box select Advanced and scroll down to the Image Size and Quality section. Select the relevant Excel file in the Image Size and Quality drop-down list. Then select a lower resolution option in the Default resolution drop-down list if we want the file size to be smaller. We select a higher resolution up to the High fidelity option if we want high-quality pictures and don’t mind increased file size. Then click OK to apply the settings.
When we select a lower resolution option in the Default resolution drop-down list, for example, 96 ppi, when we insert an image in the Excel file, the image is downsampled to the specified pixels per inch. We get a smaller file size that is convenient for emailing and other purposes.
A higher resolution means that the picture quality is maintained but the file size is increased.
Conclusion
High–resolution pictures or images inserted in an Excel file can make the Excel file very large. Large Excel files take more time to upload/download, take up more space on hard drives, and so on.
Excel gives us an option to control the file size. In the Excel Options dialog box, we can select the appropriate default resolution for images we want to insert depending on how we want to use the Excel file.
When we select a resolution other than High fidelity, we lose some pixels from our pictures. This however has the benefit of making our file sizes smaller and thus convenient for sharing on email, saving disk space, and so on. High fidelity resolution preserves picture quality but increases the file size significantly.
In this tutorial, we have learned why and how to change the default resolution of Microsoft Excel.